So you want to build a web app?
Rails is one of the quickest ways to get your ideas out of your brain, so that you can easily play around with it and test your concepts out. One advantage is having a bunch of already existing gems - which is code other people have built - that you can use in your Rails project.
Let’s say you wanted to be able to take an image URL, and be able to determine what is inside that image. Luckily for us, There’s an API for thatTM
This is a super quick-and-dirty guide to getting up and running with Rails and using public APIs to supercharge your project. I will explain the essentials as I go along, and link to other resources in case you want to dig in deeper.
What you need to know before reading this
This guide assumes that you’re familiar with some HTML, CSS, and Javascript, and how they relate to each other. It also assumes you might be new to Rails, so it gets you to “hello world” in as few steps as possible.
Part 1 of 4: Alright, what do we need?
First, if you don’t have it yet, install rails in your machine.
If you already installed rails, go ahead and create a new app
$ rails new image_shopper
This will probably take a couple minutes. Remember to breathe again when it’s done.
Easy so far! Ok, that command creates a new folder called image_shopper - let’s move into it and see what we got.
$ cd image_shopper/
$ bundle exec rails server
You should now be able to see your brand spanking new app in http://localhost:3000
Doing good so far? Ok, but no time for pats on the back, let’s keep going.
Make a git repo
At this point, you want to use version control so that you can easily “save” your progress using a commit. Let’s use Git. Learn more about what Git is here.
$ git init
$ git add .
$ git commit -m "first commit, hooray!"
Sweet, now we’re ready to move on.
Part 2 of 4: Make a homepage
The quickest way to get a new homepage up is to run this command:
$ rails generate controller home index --no-helper
This generates a bunch of useful boilerplate code for us, and puts files in their proper place, ready to be edited.
Open up routes.rb and replace the line get home/index with this:
root "home#index"
Find out more about routing here.
Now, refresh your browser again and you should see a fresh new page!
What just happened?
Let’s look at what this command generated:
-
Added a view
app/views/index.html.erbThis is the webpage that you just saw. You can think of it as a regular html page, but it’s more than that. You can now edit this page and put all your html in here.
-
Added a CSS file
app/assets/javascripts/home.scssThis is the CSS that will be applied to this page. Note that the rules in this CSS will still apply to all the other pages, so watch out. Having this file makes it really easy to organize your code though, and you can be clever about keeping your styles specific to this page.
By default, this will use Sass as a preprocessor, but you can still use just regular CSS if you wanted. Sass is super cool, though.
-
Added a Javascript file
app/assets/javascripts/home.coffeeThis is the Javascript file for your page, you can put any related JS code for this page in here. If you don’t want to use coffeescript, you can simply rename the file to have
.jsinstead of.coffee.Note that any javascript you put in here also runs on the rest of the pages, so you’ll have to get clever if you want to make the JS page-specific More information about that here.
-
Added a controller
app/controllers/home_controller.rbThis is, in its simplest sense, what ties the model (the data in your database) to your view. Learn more about the relationship between a controller and a view.
-
Added a test
test/controllers/home_controller_test.rbWe are not going to tackle tests in this quick and dirty guide, but you should learn more about testing too.
Now, you’re ready to edit the HTML, CSS and JS files to create whatever you need!
Did you notice?
Here’s a run down of the commands you had to write so far:
$ rails new image_shopper
$ cd image_shopper/
$ bundle exec rails server
$ rails generate controller home index --no-helper
The first and last commands were just Rails building some boilerplate code for you. Essentially, you created a webapp by typing (or copy-pasting) two commands in the terminal. Did you notice? Cool, huh?
Part 3 of 4: What about using other APIs?
So you have a good base to build something, awesome.
A lot of times, you’ll want to build on top of existing technologies, especially in a hackathon setting. For our example, to find out what objects are inside an image, we’d probably want to use an existing visual image recognition API, since creating a deep learning algorithm might be a tad bit complicated ;)
Clarifai is one of those visual recognition APIs that can understand what is inside an image and return tags that describe your image. I, along with Prince Wilson, have made a Ruby client gem for Clarifai that allows you to easily leverage this API within your Ruby code. We call it ClarifaiRuby. We can use that in our existing project today!
Simply add this line into your Gemfile (at the bottom of everything, to keep it simple):
gem 'clarifai_ruby'
Stop your server (ctrl+c) and run
$ bundle install
Now, clarifai_ruby is installed in your project! Refer to the docs for ClarifaiRuby for a look at the complete usage, but in this tutorial we’ll look at the simplest usage.
How does the view relate to the controller?
It’s important to get a basic understanding of how the controller relates to the view before we start coding.
First, when a URL is typed into the address bar and the app receives the URL, it routes it to the proper controller using the routes.rb file. Then, the request goes to the action inside that controller found in the routes file, along with any params passed into it. Then finally, the view is rendered to show the webpage to the user. Here’s a rough sketch, with our example so far:
[ URL ] -> [ routes.rb ] -> [ controller ] -> [ action ] -> [ view ]
                            HomeController    index         index.html.erb
Generally, you want to do computations on the controller, and pass in the data to the view, and all the view should do is to display the data.
Modifying the Controller and the View
Now that we Let’s open up home_controller.rb and copy and paste this in:
class HomeController < ApplicationController
  def index
    # Defaults
    @tag_response = []
    @tags = []

    get_tags if params[:image_url].present?
  end

  private

  def get_tags
    # Get tags for the image given from Clarifai
    @tag_response = ClarifaiRuby::TagRequest.new.get(params[:image_url])

    # Extract out just the words from the tags
    @tags = @tag_response.tag_images.first.tags_by_words

    # Save the image url so we can access it later
    @image_url = params[:image_url]
  end
end
That’s a kind of rough solution, but that basically uses the ClarifaiRuby::TagRequest object to request tags for an object. We then put the result in the variable @tag_response, which is accessible in the view layer. Now, we know what the response is going to look like (because we looked at the docs), and we are only interested in the list of words that Clarifai gives us, so we extract those words and save it in the @tags variable. (since Clarifai gives you a bit more than just the words)
Now, we need to expose an interface that will allow us to interact with this - we want to allow a user to give us the url for an image and then output all the words Clarifai returned to us, so we can put this in the view index.html.erb:
<h1>Tag an image</h1>

<%= form_tag "/", method: "get" do %>
  <%= label_tag(:image_url, "Image URL:") %>
  <%= text_field_tag(:image_url) %>
  <%= submit_tag("Tag it!") %>
<% end %>

<br />

<%# Display the image that was given %>
<div class="image_wrapper">
  <% if @image_url %>
    <%= image_tag @image_url%>
  <% end %>
</div>

<%# Loop over the list that of words and display them in their own list item %>
<ol class="tags_list">
  <% @tags.each do |tag| %>
    <li><%= tag %></li>
  <% end %>
</ol>
This is actually an ERB file, which means that Rails did a little bit of transformation to this code to turn it into a proper HTML file. This is why you can use the form helper methods, such as form_tag, label_tag, text_field_tag, etc, that are essentially shorthands for creating html tags.
Notice that we were able to reference the variables we set up in the controller and display them in the view. This is generally what you want to do, to separate the logic from the presentation of the data.
And now, run your server again
$ bundle exec rails s
and refresh your http://localhost:3000
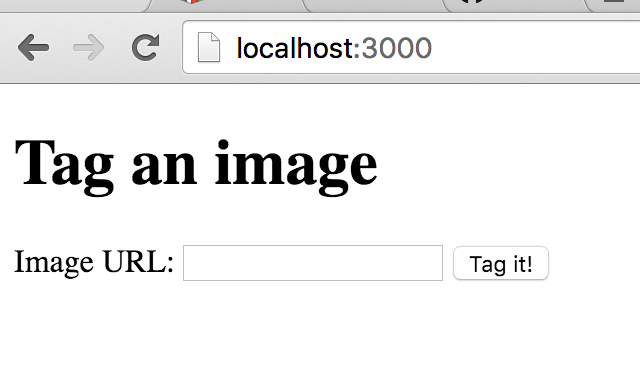
You can now enter an image URL in the field, hit “Tag it!” and this will use the Clarifai API to return tags for the image which will then be displayed back to the user.
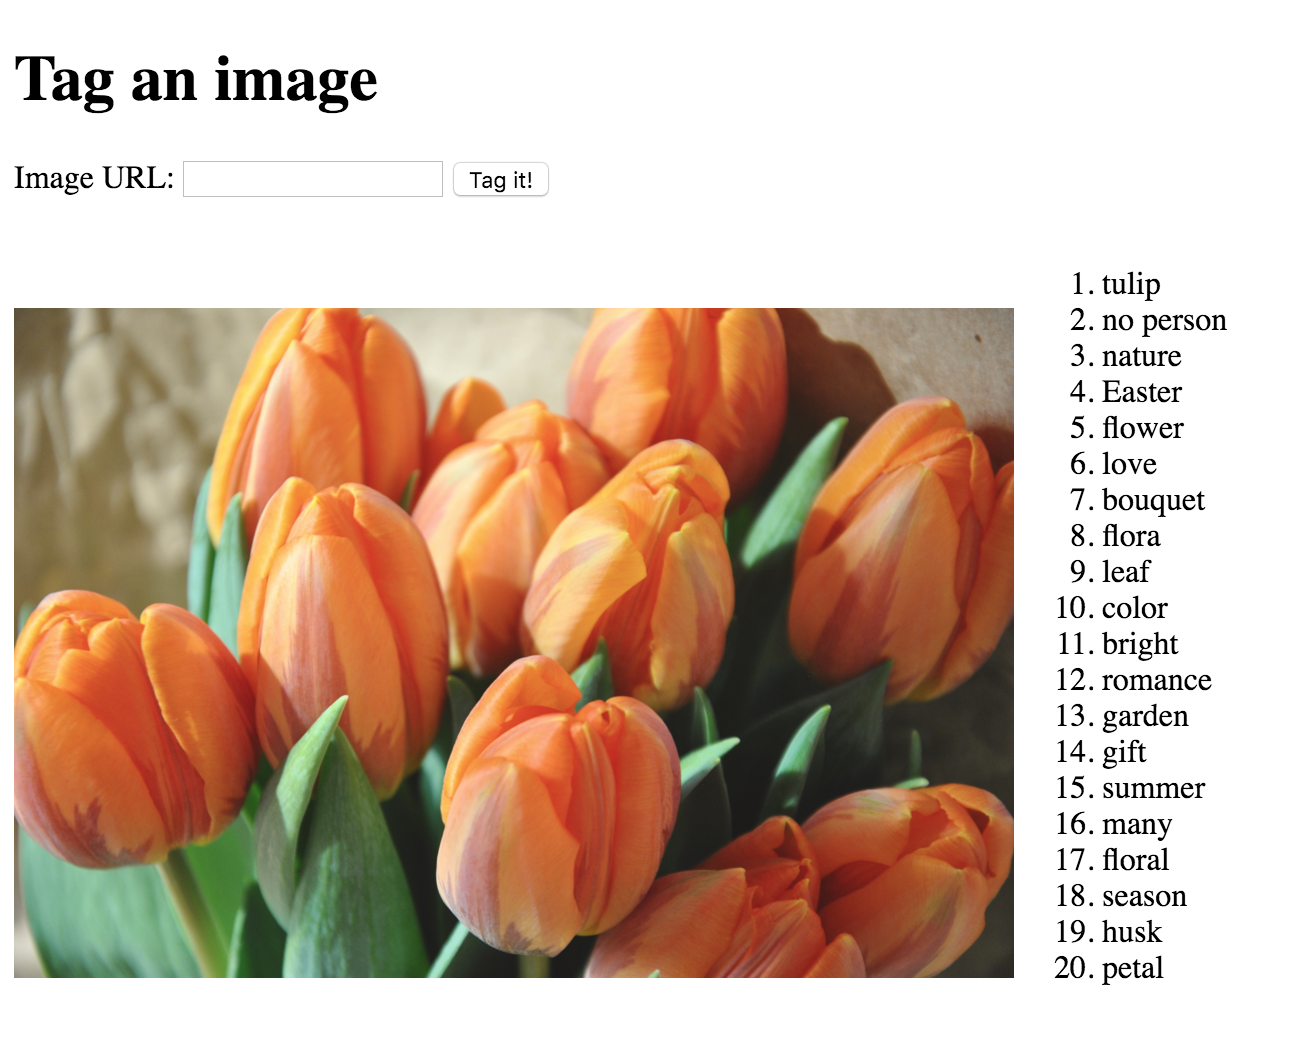
The page is a little unwieldy at the moment, especially if the image happends to be large, so we can use some CSS to make it a little more usable.
.image_wrapper {
  width: 500px;
  display: inline-block;
}

.image_wrapper img {
  width: 500px;
}

.tags_list {
  display: inline-block;
  width: 100px;
}
And here’s the final output:
(Part 4 of 4) Hooray! We did it!
We generated a base webapp in essentially two command lines, and we were able to install a gem to take advantage of an existing public API. We edited the controller and the view to use the gem, and was able to create a working demo within minutes. Rails was built to make it easy for you to get your ideas out, and it’s the perfect thing to use when you want to build fast. I hope this super quick-and-dirty guide gave you a good overview of how to get started with Rails, and encourages you to learn more!
You can find all the code from this tutorial here. Enjoy!